This article is about stencil testing: a functionality you can use when writing shaders. It will discuss what the stencil buffer is, and gloss over some possible applications of the technique. It also contains some ideas that you might be able to execute using stencil testing.
This is very much an overview of stencil testing. It does not discuss Read / Write masks or specific commands for frontfacing or backfacing geometry.
This article is focused on Unity developers, but it might be useful in a broader context.
Stencil buffer
The stencil buffer is a 2D grid of values. Every value corresponds to a pixel on the screen. Based on the values in the stencilbuffer, pixels can be discarded. (or values in the stencil buffer can be manipulated) This is called stencil testing. It works as portrayed in the picture below.
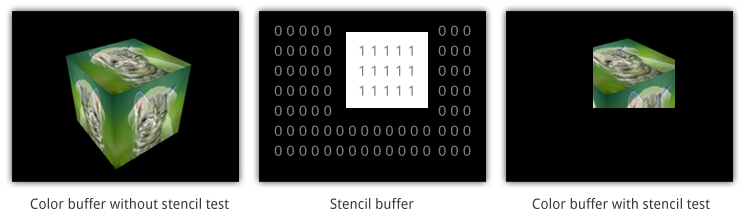
In this example, the stencil buffer is set with some 1’s, then, only the pixels for which the corresponding value is 1, are drawn.
The values range from 0 to 255. In Unity, this value starts as 0 for every pixel.
Position of stencil buffer in rendering pipeline
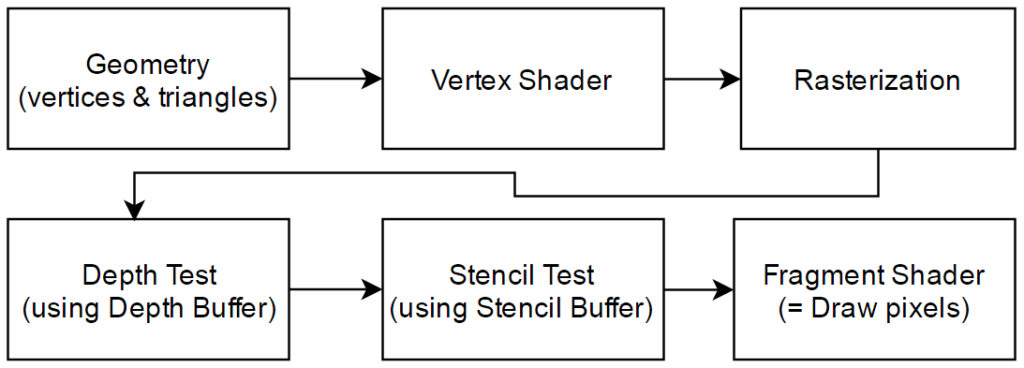
Important to note is that the stencil buffer is an extra layer on top of the depth buffer. That means that when a pixel is not drawn because it has been discarded by the depth buffer, the stencil test cannot make that pixel reappear again. It is possible to change the value in the stencil buffer that corresponds to that pixel, but that’s it. If you peek ahead to the pseudocode approximation of how stencil testing works, you will see that a pixel only gets rendered when the depth test passes.
Implementation in Unity
In Unity, you can manipulate the stencil buffer through a separate stencil section within a subshader or within a Pass. (similar to where you would place the Tags section)
Shader "shadername" {
 Properties {
  _PropertyAwesome ("Awesomeness", 2D) = "white" {}
 }
 Subshader {
  Stencil {
   //stencil section for entire subshader
  }
  Tags { "RenderType" = "Opaque" }
  Pass {
   Tags { "Queue" = "Geometry" }
   Stencil {
    //stencil section for this pass
   }
   CGPROGRAM
    //cgcode for actually drawing pixels, either through a vertex+fragment shader, or through a surface shader
   ENDCG
  }
  Pass {
   //regular pass with no stencil section
   CGPROGRAM
    //cgcode for actually drawing pixels, either through a vertex+fragment shader, or through a surface shader
   ENDCG
  }
 }
}
Stencil section
Inside the stencil section, you can issue several commands that determine how the stencil testing is done and what influence the results should have. These are all described in the unity documentation as well (http://docs.unity3d.com/Manual/SL-Stencil.html), but for some reason the explanations there didn’t really ‘click’ for me.
Ref = reference value. Like every value in the stencil buffer it ranges from 0 to 255. This is the constant value used when comparing.
Comp(arison) specifies which type of comparison to use. (I suppose this is similar to the types of comparison you can specify when depthtesting)
Pass, Fail and Zfail can be seen as events that get called by the stencil functionality.
Pass is called when both the depthtest and the stenciltest pass (note, this is the only case in which the pixel is actually drawn)
Fail is when the depth test passes, but the stencil test fails
Zfail is when the depth test fails, but the stencil test succeeds
When Pass, Fail or Zfail trigger, they can perform an operation on the value that is currently being tested in the stencil buffer. There are several of these StencilOperations. A special case is the ‘replace’ operation, which writes the reference value into the stencil buffer (ie. the value for the current pixel is being overwritten with the reference value)
Stencil testing in pseudocode
Below you can see a piece of pseudocode approximating how stencil testing works and how the different commands influence this process.
if (valueOfCurrentPixel <comparison> referenceValue) {
 if (depthTestPasses) {
  Pass(stencilOperation);
  Render(currentPixel);
 }else{
  Zfail(stencilOperation);
 }
}else{
 Fail(stencilOperation);
}

Pass/Zfail/Fail(stencilOperation) {
 if (stencilOperation == replace) {
  valueOfCurrentPixel = referenceValue;
 }
}
Practical Example
(Note: I know this effect can be achieved through different means than stencil testing, but yeah… then I can’t explain how stencil testing works ;p)
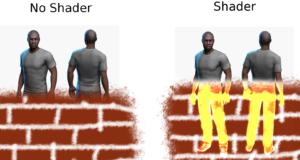
Okay. We are going to use stencil testing to draw objects that lie behind other objects. Say, for instance, an enemy is crouching behind a wall. We may want to see this enemy anyway, but maybe with an outline, or in a single color. A picture of the effect is shown below.
So how would we go about achieving this? We can simply draw the model twice: First, we render it like we normally would. However, for every pixel that fails its depth test (ie. every pixel of the model behind the wall), we’ll set the stencil buffer to a specific value. Then, when we draw the model for the second time, we will check whether the stencil buffer contains that specific value. If it does, that means the pixel we’re processing at that moment is behind the wall. We can then draw it anyway, but in a different style.
So what we want is:
First Pass {
 draw normally
 set stencil value to a specific value
}
Second Pass {
 compare value in stencil buffer to the specific value
 if they match
  draw special
}
or visually
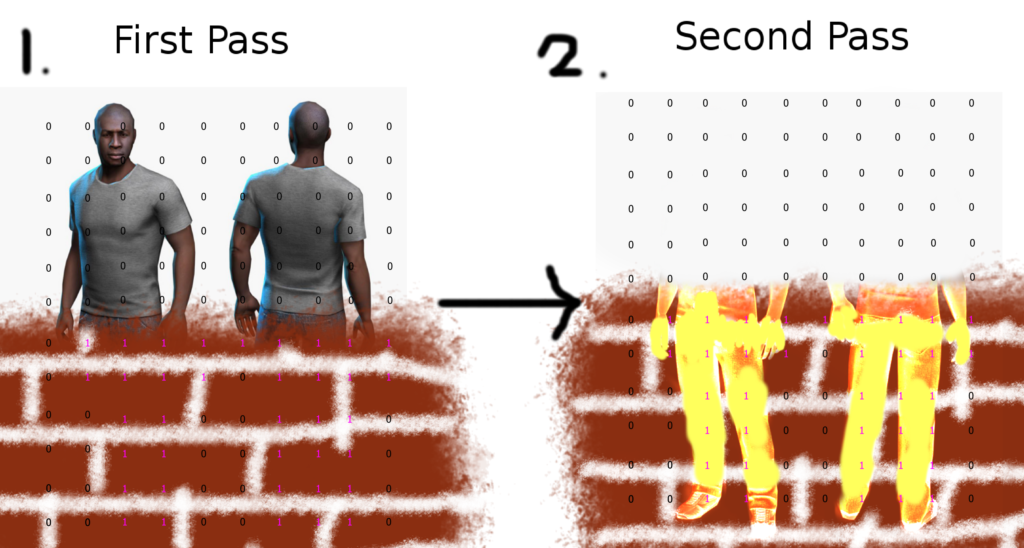
(note, in the picture I used the value 1, but you could use any nonzero value)
Now, for the actual code.
Shader "Seethrough" {
 Properties {
  _MainTex("Texture",2D) = "white" {}
  _BackTex("Showthrough Texture",2D) = "black" {}
 }
 Subshader {
  Tags { "RenderType" = "Opaque" "Queue" = "Geometry" }
  /*First Pass, renders the normal texture, sets values in the stencil buffer for the pixels where the depth test fails (ie. behind objects)*/
  Pass {
   Stencil {
    Ref 1
    Comp always
    ZFail replace
   }
   CGPROGRAM
    //draw normally
   ENDCG
  }
  /*Second Pass, render only pixels that have value 1 in the stencil buffer, ie. the pixels that weren't drawn the previous pass) uses the second texture for this*/
  Pass {
   Ztest always
   Stencil {
    Ref 1
    Comp Equal
   }
   CGPROGRAM
    //draw special
   ENDCG
  }
 }
}
Posting the complete drawcode would blow up the size of this article. Please download the complete shader code including different examples here:
Seethrough Shader Pack (1762 downloads)As you can see you can use the stencil block in a Pass in two different ways: to “mark” certain areas of the model for further passes, or to draw a model based off the marks that were placed by a previous pass.
A thing to note here is that in the second pass, you should set the depthtest (=Ztest) to always. This forces all faces to be drawn, which is what we want, because if we wouldn’t do this, only the faces not obscured by other objects would be drawn. But the face which are not obscured by other objects aren’t marked in the stencil buffer, which means nothing will be drawn in the second pass.
Control Pass execution order with the Queue tag
In the Tags section of a pass, you can specify a value used to determine which Pass to render first. Geometry (standard for regular solid objects) is equal to a value of 2000. Higher values mean the Passes will be drawn later (ie. on top) of lower value Passes. You can specify your own value by putting +1 / -1 after the Geometry/Transparent/Background specification.
Tags {"Queue"="Geometry-10"}
Tags {"Queue"="Background+1"}
See all values: (scroll down a bit, they’re in a really short paragraph)
http://docs.unity3d.com/462/Documentation/Manual/SL-SubshaderTags.html
End
Hopefully you now know what stencil testing is and how you can use it for your own special effects. Below are some ideas for which the stencil buffer may be used. (I haven’t tried them out yet) Good luck writing shaders and making games!
Ideas
Draw on objects using a stencil buffer. You could use a sphere you control through script to obscure parts of the model, then draw those with a certain color.
Debug stencil shader. Give a different value if there is a different value in the stencil buffer. Most likely possible, but if you’d do this for all 256 values, it would be a hell, so a different solution is required.
Sources
https://en.wikipedia.org/wiki/Z-buffering
Unity documentation
http://docs.unity3d.com/Manual/SL-Stencil.html
http://docs.unity3d.com/462/Documentation/Manual/SL-SubshaderTags.html
seethrough effect
http://studenthome.hku.nl/~niels.dejong/oudesite/files/shader/JongNielsde_shader_eindopdracht_v1.pdf
Thank you very much Niels! Your article was very helpful in explaining the to me too somewhat irritating Unity documentation of the stencil buffer.
Good to hear it helped you! 🙂
Pingback:Learning About Shaders – Adam Gwenter
Pingback:A Look at Spyro’s Portals – Rendering the Background – DANIEL POKLADEK
Pingback:A Look at Spyro’s Portals – Rendering the Background – Daniel Pokladek